Setting Up an Azure Network Security Lab (AZ-500 Study Series)
- Shone Pious
- Nov 20, 2025
- 4 min read

Updated: Nov 22, 2025

In this blog:
Part 1: Environment Setup
This blog is part of my AZ-500 (Azure Security Engineer Associate) certification study series. In this series, I’m building hands-on labs inside Microsoft Azure to learn Azure’s core security concepts — starting with network security.
For this lab, I am using a personal Azure PAYG subscription. Azure offers many free and “always free” services, but resources such as virtual machines incur usage-based costs, so shutting down unused VMs is important.
➡️ Click here to see my blog on Private Endpoints and DNS zones.
Configuring a resource group
Go to Resource Groups, and click Create:

Choose your Subscription, Resource Group name, and Region:

Creating The Virtual Network
Go to Virtual Networks → Create

Configure the subscription, resource group, and VNet name:

Set your IP range, then click Review + Create.
Make sure no extra security services are toggled on — we do not need Azure DDoS Network Protection for this lab.

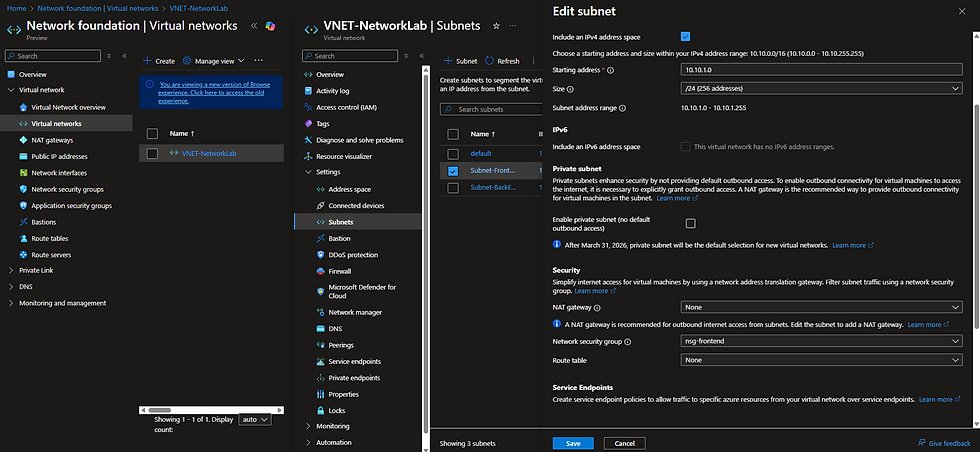
Create Subnets
Inside the VNet, Subnets → + Subnet
Create the FrontEnd subnet:

Now create the BackEnd subnet:

Creating the Network Security Group
We will create one NSG per subnet (best practice + AZ-500 exam pattern).
Go to: Azure Portal → Network Security Groups → + Create
Configure the first NSG (nsg-frontend):

Do the same for nsg-backend.
Purpose of each NSG:
nsg-frontend → controls traffic to/from the VM
nsg-backend → allows private endpoint traffic over HTTPS
You should now see both NSGs created:

Attach NSGs to Subnets
Go to your VNet → Subnets.
Select the FrontEnd subnet → assign nsg-frontend:
Then assign nsg-backend to the BackEnd subnet:

Create the Storage Account + Private Endpoint
Search for Storage Accounts → Create

Configure as follows:

In Networking, temporarily enable Public Network Access (we will restrict this later):

Private Endpoint
Still in the Networking tab → add a Private Endpoint:

Use the BackEnd subnet, and leave everything else default.
Select Microsoft Managed Keys (MMK) for encryption.
NOTE: My screenshot accidentally shows public access enabled. For this lab, public access will eventually be disabled.
Once deployed, your storage account should look like this:

Create the VM (FrontEnd Subnet)
This VM will be used for NSG testing and private endpoint connectivity.
Important:
Creating a VM is free on PAYG only if powered off, but running it consumes billable hours — though the B1s size includes 750 free hours each month.
Go to Virtual Machines → Create

Choose Size
Select B1s under “See all sizes”:

Basics Configuration


Disk Configuration

Networking Configuration
Attach the VM to the FrontEnd subnet and nsg-frontend.

Optionally enable auto-shutdown, or configure it later.
Click Create.
SSH into the VM
Download the SSH Private Key
Once deploying, Azure will ask you to download the Private key for your VM. This is just an RSA based key that we get when choosing to authenticate over SSH for an Ubuntu VM. Azure will keep the public key on the VM, and we will download the private key – Just download the .pem file for future reference. We will need this key when we SSH into the VM through the terminal.
Accessing the VM
Ensure the VM is running.
Let’s now spin up our VM and SSH into it to verify that it can access the backend subnet and storage endpoint.
Since I’m using Windows, I will need to SSH from PowerShell, using the VM’s public IP address which can be found in the screen shot below:
Before we start, lets make sure that the PEM file has read instructions (It doesn’t):

icacls "C:\Users\shone\Documents\vm-frontend_key_1117.pem"Fixing PEM File Permissions on Windows
Run these two commands to fix read access:

icacls "C:\Users\shone\Documents\vm-frontend_key_1117.pem" /inheritance:r
icacls "C:\Users\shone\Documents\vm-frontend_key_1117.pem" /grant:r "$($env:USERNAME):(R)"Connection Issue: SSH Timeout
When I first tried to SSH from my laptop, I got: Connection timed out
But Azure Bastion connected successfully:

Why This Happened
When deploying the VM using the existing NSG, inbound SSH may be blocked.
Azure Bastion uses private connectivity, so it bypasses NSG restrictions.
My local computer was attempting SSH over the public internet — blocked by NSG rules.
I tried multiple fixes, but instead of documenting all the failed attempts, here is a helpful StackOverflow explanation: https://stackoverflow.com/questions/46436762/cannot-ssh-to-azure-vm
Allowing My Computer’s Public IP
Find your computer's public IP address:
curl ifconfig.meAdd an inbound rule to nsg-frontend:

I configured it like this:

This still didn't work.
Temporary Fix for Lab Purposes
I set the source to ANY.
This exposes SSH (port 22) publicly, which is insecure in production — but acceptable temporarily for a controlled lab.
Connect successfully via SSH
You will get a first-time connection prompt:

Type YES and hit enter.
Retry the command, and you should now be inside your VM:

And that's our Azure security environment set up!
We have -- a VNET with subnets, NSGs applied, a storage account with a private endpoint, a functioning VM in frontend, SSH connectivity, and a full environment ready for NSG testing and private endpoint validation.


Comments